15/08/2010

Onion soup with 'cheesy' garlic crouton

For some reason I've had onion soup floating around my head for the last couple of days despite never having made it, or as far as I can remember, never even having eaten it before. It might have had something to do with knowing there were a lot of onions in the cupboard that should perhaps get used up, mixed with a craving to actually cook something different for our tea rather than just accepting that we eat the same old things on a fairly short rotation.

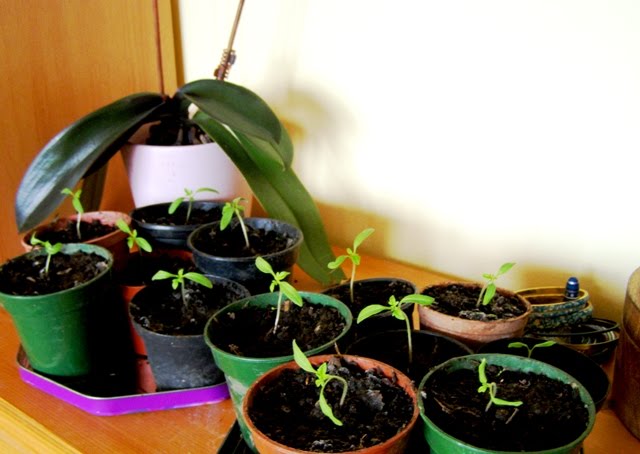
So, I decided to give it a go. What would be the most amazing thing is if I had made this with my own onions and garlic - that's not to say I stole the ones I used obviously, just how cool would it be if I had grown them myself? Theo's quite understanding of my obsession with edible gardening although as we have recently helped ourselves to a slice of city living once again my edible gardening currently goes as far as this chilli plant rehoused from mums greenhouse (I'm not sure what it thinks of its new 'urban' view of the back of the old Debenhams building...). I am rather proud of my greenhouse chillis though which have spread themselves far and wide with one on it's way as far as Newcastle. I had around 14 plants from seeds that cost me 99p :)

They do however have nothing to do with my onion soup, which was incredibly satisfying and a judged a success even by Theo who doesn't usually like soup, well not homemade ones anyway. Thanks.

I looked at a few recipes, Delia's was hours long and most were quite fancy with the addition of alcohol of one sort or another. My cupboards didn't quite stretch to this but I would certainly make it to the same recipe again as well as experimenting with other additions.

Ingredients
  • 1kg onions
  • 1/2 a date
  • 6 cloves of garlic
  • 50 g vegan spread plus a bit extra for spreading
  • 1.2 L vegan vegetable stock
  • 1/2 tsp marmite
  • 4 slices of wholemeal bread 
  • Enough vegan cheese to top 2 slices of bread
1. The first thing to do is thinly slice your onions.

2. Then melt the 50g of vegan spread, I used Vitalite, with 2 cloves of crushed or chopped garlic in a big saucepan. 

3. Add in the onions. At first these filled the pan but they'll soon reduce down to much less than you'd think. I also added 1/2 a finely chopped date as some recipes during my browse for inspiration had added 1/2 tsp sugar at this stage to help caramelise the onions, I always prefer to use a less processed form of sugar and also just don't have any regular sugar in the cupboard!

4. Cook the onions on a medium heat for around 25 mins, stirring occasionally, until they are nice and caramelised and look golden and sticky.


5. Whilst the onions are caramelising, make the garlic croutons. These were so good, (luckily I made four so we each had one to top our soup and one to munch whilst dishing up!) and as I'm a fan of simplicity they were also very easy. They might suit some peoples preferences better if you use fancy white bread but I always prefer wholemeal and just used the sliced wholemeal I had to hand which worked a treat taste wise. Spread the slices of bread with either some vegan spread or olive oil (both sides) and then add a clove of chopped garlic on top of each slice. Cook in the oven for 25 minutes at around 180C until completely crisp and crouton-ey. Best to make at least one extra slice so you can check if they're perfect ;)

6. When the onions are caramelised add the vegetable stock, Marmite and any other seasoning you fancy and simmer for around 20 mins filling the kitchen with the most beautiful caramely onion smell and making you very hungry.

7. When the soup is done, ladel some into your bowl add a whole garlic crouton on top, top this with your favoutite vegan cheese and place under the grill for about 2 mins until the cheese starts to bubble. Then eat!


This recipe made enough for us each to have it for dinner last night avec croutons with enough left over for a light lunch today. Yum.

To end on a sugar laden confession - I did buy sugar (now all gone!) for my new cupboards last month when we first moved in in order to attempt to recreate the oversized fondant fancy cakes as seen in Tescos for Theo's birthday. It ended up as the 'lemon' variety rather than the pink strawberry I had originally planned as no red/pink vegan food colouring could be found last minute. Luckily the health food shop opposite did have vegan squirty cream for the central dome! Unfortunately only one pic was taken which doesn't quite do it justice, but it was 4 days after we had moved in and 2 after we had returned 'home' again to sell our little van (sob) so I was a bit knackered to remember to take lots of nice pics :) It was far from perfect  aesthetically but it tasted amazing and even meant we visited Herbies without ordering desert for the first time ever.


12/05/2010

Goddess of the garden

Ok, so this might not be a scummy vegan cake/othertastydish post but its subject *is* edible and it *is* vegan so bear with me...Of late one of my most favourite things to do in the whole world, and as such what most of my time has been spent doing, is gardening and it is this passion that I feel pardons me from a slightly off topic post. Plus I shall post an enormously amazing recipe using the fruits of my labour when they have finished labouring. Honest.

I am terrible for remembering to take 'before' photos of projects and this case was no different. My project was basically my very own 'grow your own' which centred around the removal of a decades old sprawling compost heap (I'm sure there must have been literally tonnes of compost to shift) and in its place construction of two raised beds for delicious home grown veggies. Now, picture the biggest heap of soil you can, cover it with weeds, nettles and scratchy brambles, add in some trickily dug in metal poles and a foul smell, make the whole pile that bit bigger... and you're ready to continue reading.

Et, Voila!


In a way it is an effective 'before' as they are yet to be full of bounty, although they are getting there. As an added bonus they were made from some bargain basement priced decking, posts and all for less than £14. Currently in bed no. 1 (I'm thinking now perhaps a more charming name might encourage it to grow better? suggestions welcome) ...


there's mange tout,


an abundance of radishes (- the overflow 'thinnings' of which have now been transplanted to bed no. 2),


beetroot that's just beginning to come to life, 


a few rows of round carrots that now are starting to actually look like carrots,

also just emerging are spinach, borage, mixed salad leaves and 2 courgette plants,


Not to mention some stylish bird deterers i.e. 2 CDs back to back and a string of jingle bells


For a prettier back drop to the area than a bare fence I also fanned some already existing current bushes along the fence  leaving a section to plant some tall growing delicious smelling sweet peas (this is the area you can see in the second pic). These sweet peas gave me the tinsiest bit of heart ache as as soon as I had planted the idea  let alone the seeds, I could smell the beautiful wall of flowers but the blighters just weren't coming up. Weeks and weeks I checked on brown dull soil until patience finally prevailed and now I happily have quite a few adventurous little shoots coming out to make the most of life.


I also decided to plant a trench against a shed wall to make the area a little less ugly, and these ones are popping up too - yay!


Luckily the cat who decided to come and see what was going on got distracted by the grass before noticing my precious sweet peas


Waiting in the green room for their moment of fame are perhaps the ones i'm most excited about,


Can you guess what it is yet? Perhaps not. These are my sweetcorn some of which are destined for a space in the raised beds and some of which I shall probably keep in the greenhouse as an experiment. I really hope I actually get to pick and eat a big golden cob from these babies, mmm sweetcorn. There's also chilli avenue and a large number of tomatoes both of which I grew from those gimicky 99p cardboard carton cups, one from Wilkinsons our Woolies replacement and one from a garden centre. Both were equally and very successful, you get plenty enough plants for the average household. The tomatoes I'm wary about, I haven't heard much positive about growing them overly successfully and my new gardening icon/ person I so want to be Mrs Fowler almost put me off, perhaps I shall prove the tougher gardener. I've even planned ahead and prepared marigolds for companion planting with them, fingers crossed.


Plant suggestions for the shadier half of bed 2 would be much appreciated, today I put some of my BBC 'dig it' free carrot and salad seeds in the first half but there's still a bit of space to fill. I have french beans still to come but I decided against a picture of these thinking perhaps although each shoot is unique and special to me they are perhaps akin to other peoples baby photos for anyone else :) 

I really am very taken with the whole gardening process at the moment, and if nothing else it provides a plus point and distraction to living at home whilst you are an unempolyed postgrad looking for work (yes in case you hadn't guessed already this is sadly not my very own garden). I am considering taking an RHS horticultural qualification once I have a job, and have discovered that I could start with the advanced course already having a science background. Has anyone had experience of this course or other distance learning? Currently though I am just enjoying the garden whilst I can, I'm sure when I do manage to move somewhere I can walk to the shops, the cinema, veggie restaurants, and work I shall have to sacrifice a lot of planting space and the green view from my bedroom window.


06/04/2010

Scrumptious Simnel Cake

Having never made a Simnel cake before, vegan or non vegan, I decided it really was time to give it a go. I knew it was a traditional Easter cake, and as it turns out was often eaten on Mother's Day too, but I didn't really know what one entailed. After trawling through a large number of recipes for inspiration and even a google image search to see what sort of thing I was meant to come out with I set out to bake my first Simnel cake. Heres how it turned out


It was absolutely delicious - despite a few worries I had after the top sunk whilst cooling and it began to look a bit crumbly.

Ingredients
For the cake
  • 250g brown sugar
  • 250g Pure soya spread (or any vegan margarine)
  • 250g white self raising flour
  • 4.5 *eggs*
    • 1/2 cup blended tofu = 2
    • 2 tbsp oil, 4 tbsp water, 4 tsp baking powder = 2
    • 1 1/2 tbsp wholewheat flour = 0.4
  • 30g ground almonds
  • 150g sultanas
  • 150g cherries
  •  200g apricots (I used tinned over dried and it helped to make the cake fantastically moist, fresh would also be good)
  • 3 tsp mixed spice
  • 2 tsp ground ginger
  •  3 tbsp soya milk
  • Marzipan ~ 150g (enough to roll out a disk approximately 1cm thick the size of your cake tin) I used bought vegan marzipan but there are loads of great recipes to make your own if you've got the time.
For decoration
  • Marzipan ~300g (enough to roll out a disk approximately 1 cm thick the same size as the top of your cake and craft 11 marzipan balls)
  • 2 tbsp Apricot jam (I didn't have any but I made a rather yum substitute from blended apricots and sugar heated in a pan until thickened)
  • Small bunch of primroses
  • Handful of caster sugar
  • 1 tbsp agar flakes
  • 1 tbsp water

1. Begin by crystallising your primroses as these will take a few hours to dry out and harden. Pick some from your garden/ a friends garden, rinse them delicately and then dry.


2. Dissolve the agar flakes in the water and then apply the cool mixture to the primrose petals. Once coated sprinkle the primroses with caster sugar making sure it sticks all over and then place the primroses on a baking sheet and leave somewhere warm to harden (I left mine on top of the boiler).


3. Preheat the oven to 160C, now to make the cake mixture. Begin by creaming the soya spread and sugar together, then stir in the flour  almonds, egg replacements, fruit, spices and soyal milk. (Don't add the marzipan yet this is for the middle of the cake.


4. Spoon half your mixture into a nice deep round cake tin, greased and lined.


5. Roll out your marzipan 1cm thick and cut to the size and shape of your tin. Lay it over the mixture.


6. Now dollop on the last half of your cake mixture and bake in the oven for 1 hour 45 mins. Check on the cake after 1 hour to see if you need to cover it with foil to prevent burning.


7. Once cooked cool the cake on a wire rack.


8. Whilst the cake is cooling roll out the marzipan disk for the top and create the 11 marzipan balls.


9. Assemble the cake using the apricot jam to stick the marzipan on ,criss-cross the top lightly with a sharp knife and then place under a grill to brown the marzipan lightly. Sprinkle on the primroses  when the cake has cooled again and tie the cake with some ribbon. Done.


Chocolate truffle egg nests

This Easter I fancied having a go at making homemade chocolate truffle mini eggs to put in some good old fashioned shredded wheat chocolate nests. The whole process of melting chocolate, stirring in a cereal and then spooning it into colourful cases makes me feel about 10 - which I quite enjoyed! I'm really pleased with how they turned out as the whole family loved them and they looked pretty too. As an added bonus you get some wholewheat from the nests and the benefits that a bit of quality dark chocolate  gives you too (I used one with 85% cocoa solids).


I used plastic moulds to make the eggs, the other eggs are from a packet of Whizzers - a vegan version of mini eggs and absolutely delish. These haven't yet appeared in supermarkets to my knowledge but I know of a couple of independent health food stores that stock them (some year round) and they can be bought online places like veganstore.co.uk.


 Ingredients

Nests
  • Shredded wheat for the nests (about 6 should make around 12 nests)
  • Around 100g vegan dark chocolate 
  • 1 packet of whizzers and homemade truffle eggs for decoration
Truffle eggs (makes ~ 25) (adapted from BBC good food)
Shells
  • 100g vegan white chocolate
  • 100g vegan dark chocolate
  • Small bit of extra dark chocolate to melt to stick the eggs together
Filling
  • 150g vegan dark chocolate
  • 250g icing sugar
  • 250g ground almonds
  • 4 tsp vanilla
For the truffle slab (which I used to make square truffles and to fill some eggs) I used the fabulous recipe on Steven's blog, see it here http://lustrousmusings.blogspot.com/2010/03/hazelnut-truffles-reverse-engineering.html 


1. First melt the dark chocolate to create the shells of the eggs. I did this in a microwave but you can use a bowl over a pan of hot water instead if you like. Carefully spoon the melted chocolate into the moulds using the back of a teaspoon to drag the chocolate up to cover the sides of the mould too. Don't put too much chocolate in or there'll be no room for the truffle filling.


2. Do the same with the white chocolate (if you don't have quite enough moulds, carry on past this step and then come back and reuse the dark chocolate moulds once the shells have been popped out) and then leave the moulds somewhere cool to set.


3. While the shells are setting prepare the truffle filling by melting the dark chocolate and then simply stirring in the ground almonds, icing sugar and vanilla. (A taste test at this stage by a non vegan declared the truffle mixture to taste like Ferrero Rocher, good or bad you decide)


I then aslo made up a batch of truffle mixture from http://lustrousmusings.blogspot.com/2010/03/hazelnut-truffles-reverse-engineering.html  adding a little extra sugar for more sweetness.


4. Fill your chocolate shells with the truffle mixture, I also then sealed some that needed a bit extra filling with more melted dark chocolate. (The flatter you can keep the mixture at this stage, the easier it will be to stick the two halves together without having to handle them too much and melt the mould design off with your fingers)


5. Leave to cool for a little while longer until set and then pop the filled egg halves out of the moulds.


6. Now use some melted dark chocolate to stick the egg halves together, I used one white and one dark half for each egg.

7. Leave the eggs in a cool place and crumble the shredded wheat to prepare your nests. Melt the chocolate and stir in the shredded wheat until you cannot incorporate any more into the chocolate.

8. Spoon the nest mixture into paper cases and fill with Whizzer eggs and your homemade eggs. Serve with any leftover truffle mixture cut into chunks and dusted with cocoa for an even bigger chocolate hit!


Being my first attempt these were a little fiddly and I feel the eggs could be even more lovely looking if I had of flattened the egg halves better whilst still in the mould to avoid over handling the chocolate when removed from the moulds which melted and messied them up a bit. Mind you, I didn't have any returned.

30/03/2010

Tree of Jewels

This is a blog of a different nature to those I've done so far but as well as cooking I love to make things that last a bit longer than cake :) This is one of them. During a crafty moment a few weeks back I had the idea to create a wall mounted jewellery holder.


I've seen in other peoples houses pretty necklaces hung with pins on the wall as decoration and have always liked the idea. I also find my dresser in the bedroom gets cluttered with other bits and pieces (including currently ~ 12 baby tomato plants and an orchid - the light is good!). So I figured something to hang on the wall might be practical and pretty at the same time. 


As I wanted the pieces displayed to be dangly it hasn't actually saved much space as there is still a need for my separate earring tree on the dresser to hold stud backs and my wooden jewellery boxes for larger (more garish?!) necklaces and bracelets. However I do think it looks quite pretty.


I still have to think of a way for my stud earrings to take up less space...


My wall mounted effort is also good as it gives me a chance to display my favourite pieces of jewellery lthat might otherwise be stacked in a box such as the rings my nan left me which although don't get worn often have great sentimental value for me. I love the 3 stoned one especially as it was nanny's engagement ring given to her by grandad. I'm quite the romantic and so love the symbolism of such a long and happy relationship and it also serves as a special reminder of both of them for me. 


This is my favourite charm necklace and my two favourite charms, a mortar board Theo gave me on my graduation day and a birthday present hotdiamond cupcake charm which says 'fat free' - he knows me so well, if only it were edible!

I should admit this project did take a rather long time to make, I started by drawing a sketch of the shape I had in mind, refining it and drawing a grid over it to allow me to scale it up. I decided how much I wanted to scale it up by and worked out how much wood I would need. 


I then went out and found a nice bit of suitable pine wood from a sustainably managed forest (unfortunately it wasn't lying on a forest floor at the time and free of charge but sitting on a shelf in B&Q). I went for a nice chunky piece as that's what I fancied for the finished look and once purchased I drew my scaled up grid on the wood and went about copying my image over.

After this it was simply a case of jigsawing along the lines. I say *simply*, it wasn't though :) It took a pretty long time and there's nothing more disheartening than spending ages perfectly cutting around a prettly little curl only for it to snap off on you at the last minute! Still, a few design adjustments or squirts of wood glue later and your ready to go again. When it was all cut out I breathed a sigh of relief and set about carefully sanding and filing `the edges until they were nice and smooth. 


Then the excitment of the painting - initially anyway until you realise that getting paint down the edges of each curl is harder than you'd thought (thick wood has it's drawbacks). I started off wanting a light white effect allowing the grain to show through but then decided a slightly thicker coat of white sanded down when dry with a thin layer of pinky cream wiped over the top to take off the brightness looked best. 
 
Once painted I went back to search B&Q for some cute little hooks (after looking online first and becoming quite distracted by miniature hooks listed on dolls house furniture websites - cute), I found some I was happy with which were a mixture of hooks (for necklaces, rings etc.) and eyelets (for hook back earrings) . I think they were intended for net curtains but did just the job I was looking for. I simply (again with a fair bit of elbow grease involved) twisted them in by hand where I wanted them.


As a finishing touch I also gave my little bird a sparkly red gem for an eye. After rummaging down my sewing bag I found just what I was after - a bag of gems ebayed back in my frivolous uni days when one had more student loan than sense. I was rather chuffed to finally find a use for one of them as I don't think they came cheap and i'm not one for wastage of any kind these days. 

My favourite section is I think the heart which was semi by accident - once I noticed it I made sure to be careful to keep the shape as I liked it but I hadn't initially drawn it this way on purpose. 


To hang it on the wall (although it also sits rather nicely on top of the dresser) I used a screwdriver to gouge out two small indents in the back of the wood and then placed two pins in the wall to line up with the holes (trickier than it sounds). I chose to do it this way as I wanted it to sit flush to the wall and have a *hovering* type effect.


So there you have it, I'm rather pleased with it and i'm keen to have another go having learnt from this time round. Perhaps a different size and different design next time. I should get some more practice as a few family members have requested I make some more -although until I purchase a magic saw I might have to request commission from them!