30/03/2010

Tree of Jewels

This is a blog of a different nature to those I've done so far but as well as cooking I love to make things that last a bit longer than cake :) This is one of them. During a crafty moment a few weeks back I had the idea to create a wall mounted jewellery holder.


I've seen in other peoples houses pretty necklaces hung with pins on the wall as decoration and have always liked the idea. I also find my dresser in the bedroom gets cluttered with other bits and pieces (including currently ~ 12 baby tomato plants and an orchid - the light is good!). So I figured something to hang on the wall might be practical and pretty at the same time. 


As I wanted the pieces displayed to be dangly it hasn't actually saved much space as there is still a need for my separate earring tree on the dresser to hold stud backs and my wooden jewellery boxes for larger (more garish?!) necklaces and bracelets. However I do think it looks quite pretty.


I still have to think of a way for my stud earrings to take up less space...


My wall mounted effort is also good as it gives me a chance to display my favourite pieces of jewellery lthat might otherwise be stacked in a box such as the rings my nan left me which although don't get worn often have great sentimental value for me. I love the 3 stoned one especially as it was nanny's engagement ring given to her by grandad. I'm quite the romantic and so love the symbolism of such a long and happy relationship and it also serves as a special reminder of both of them for me. 


This is my favourite charm necklace and my two favourite charms, a mortar board Theo gave me on my graduation day and a birthday present hotdiamond cupcake charm which says 'fat free' - he knows me so well, if only it were edible!

I should admit this project did take a rather long time to make, I started by drawing a sketch of the shape I had in mind, refining it and drawing a grid over it to allow me to scale it up. I decided how much I wanted to scale it up by and worked out how much wood I would need. 


I then went out and found a nice bit of suitable pine wood from a sustainably managed forest (unfortunately it wasn't lying on a forest floor at the time and free of charge but sitting on a shelf in B&Q). I went for a nice chunky piece as that's what I fancied for the finished look and once purchased I drew my scaled up grid on the wood and went about copying my image over.

After this it was simply a case of jigsawing along the lines. I say *simply*, it wasn't though :) It took a pretty long time and there's nothing more disheartening than spending ages perfectly cutting around a prettly little curl only for it to snap off on you at the last minute! Still, a few design adjustments or squirts of wood glue later and your ready to go again. When it was all cut out I breathed a sigh of relief and set about carefully sanding and filing `the edges until they were nice and smooth. 


Then the excitment of the painting - initially anyway until you realise that getting paint down the edges of each curl is harder than you'd thought (thick wood has it's drawbacks). I started off wanting a light white effect allowing the grain to show through but then decided a slightly thicker coat of white sanded down when dry with a thin layer of pinky cream wiped over the top to take off the brightness looked best. 
 
Once painted I went back to search B&Q for some cute little hooks (after looking online first and becoming quite distracted by miniature hooks listed on dolls house furniture websites - cute), I found some I was happy with which were a mixture of hooks (for necklaces, rings etc.) and eyelets (for hook back earrings) . I think they were intended for net curtains but did just the job I was looking for. I simply (again with a fair bit of elbow grease involved) twisted them in by hand where I wanted them.


As a finishing touch I also gave my little bird a sparkly red gem for an eye. After rummaging down my sewing bag I found just what I was after - a bag of gems ebayed back in my frivolous uni days when one had more student loan than sense. I was rather chuffed to finally find a use for one of them as I don't think they came cheap and i'm not one for wastage of any kind these days. 

My favourite section is I think the heart which was semi by accident - once I noticed it I made sure to be careful to keep the shape as I liked it but I hadn't initially drawn it this way on purpose. 


To hang it on the wall (although it also sits rather nicely on top of the dresser) I used a screwdriver to gouge out two small indents in the back of the wood and then placed two pins in the wall to line up with the holes (trickier than it sounds). I chose to do it this way as I wanted it to sit flush to the wall and have a *hovering* type effect.


So there you have it, I'm rather pleased with it and i'm keen to have another go having learnt from this time round. Perhaps a different size and different design next time. I should get some more practice as a few family members have requested I make some more -although until I purchase a magic saw I might have to request commission from them!

26/03/2010

Banoffee fudge cake indulgence

Yes my last post does promise more raw healthy experimental dishes. No this is not one of them. To remind you it was my *birthday* and thus this delicious, indulgent, sweetness overload needs no further excuses :) I made a vegan banoffee pie not too long ago (my first blog post) and it was a resounding success so, when thinking what cake I could create to share with the family on my birthday (who I thought might not wholly embrace my raw offering), I decided to experiment with making a banoffee inspired cake. I'm very glad I did. It was an evolving creation with myself, the boyfriend and little sis Em all in the kitchen contributing ideas as to what other sweet bits we could add. The result was two layers of banana, vanilla and toffee swirl sponge, sandwiched together with toffee cream and caramelised bananas, all covered in caramel frosting and topped off with homemade fudge crumbles and *more* caramelised banana.


Ingredients

For the cake
  • 150g soya spread/ vegan margarine
  • 200g caster sugar
  • 4 *eggs*
    • 1/2 cup mashed banana = 2
    • 1 tbsp oil, 2 tbsp water, 2 tsp baking powder =1
    • 2 heaped tbsp wholewheat flour = 1
  • 275g flour
  • 2 tsp baking powder
  • 100 ml soya milk
  • 2 tsp vanilla
  • 1 medium banana mashed
  • 1/4 of the toffee sauce to swirl through
For the toffee sauce
  • 250g sugar
  • 200g soya spread
  • 250ml Alpro soya alternative to single cream
  • 2 tsp vanilla
For the caramelised bananas
  • 2 medium bananas
  • 2 tbsp brown sugar
  • 2tsp water
For the Toffee cream filling
  • 1/4 of the toffee sauce
  • 1/4 packet of organic CremoVita soya cream
For the fudge
  • The remaining 1/2 of the toffee sauce - you'll see
For the caramel frosting
  • 3 heaped tablespoons soft dark brown sugar
  • 2 tsp water
  • ~ 500g Icing sugar (I ended up adding it bit by bit to desired thickness and lost track!)
  • 80g Soya margarine (Ajduct quatities if you only want to cover the top etc)

    Sound like a faff? Well it did take a little while but I was experimenting as I went and it's actually pretty simple, plus you'll end up with this don't forget...


    If you're tempted enough to give it a go, here's what I did:

    1. Begin by getting the cake mixture made - it helps if you have an assistant as I did for this one who can be making and stirring the toffee sauce at this point too but don't worry if not, i'll assume for my directions 1 person is cooking - and just remember when it comes to the size of slices served who contributed and who didn't...

    2. Cream the sugar and vegan margarine together and then incorporate your *eggs*, flour (sieved) and baking powder. Add the 100ml soya milk which will help bring the mixture together nicely and make it a good consistency. Stir in the vanilla and extra 1 mashed banana and have a taste to check the amount of flavour is good (add more banana or vanilla if you like).

    3. Now your cake mixture is complete put it into some greased cake tins and leave them to the side whilst you get the toffee sauce on.

    4. For the toffee sauce add the vegan margarine and sugar into a saucepan and heat whilst stirring until the sugar dissolves. Once dissolved pour in the cream and vanilla and stir over a high heat until the sauce thickens.


    This will take around 30 mins. To check the thickness of the sauce when cool, drop a teaspoonful into a glass of cold water and then remove it again to see what sort of texture you have.


    5. When the sauce has reached a nice thickish consistency remove half from the pan and put to one side for later in a separate dish.


    6. Keep the rest of the sauce on the heat for a further 10 mins or so until it becomes really thick and a bit grainy. When this has happened remove it from the heat and cool it in a dish (I surrounded mine with cold water to cool it a bit quicker). It won't be the most photogenic of all things but you will have a delicious slightly crumbly fudge when it cools likened by those in my kitchen to the delicious but sadly not vegan Devonshire Roly's fudge.


    7. It's now time to get the cakes in the oven, preheat to 180C and then take the batch of toffee sauce you put aside and swirl as much of it as you like in to your cake tins. I used about 1/2 (so 1/4 of the original toffee sauce mixture) and kept the rest to use in the cream filling later. I wasn't sure how it would work but having tried it now I would probably swirl even more toffee sauce through (I didn't use very much of what was left for the cream filling and it worked well inside the cake).


    Dollop the toffee sauce on and use a fork to swirl it evenly through the cake mixture.


    To be sure the toffee wouldn't burn on top I then used the back of a spoon to smooth over the top of the cake.


    8. Cook the cakes at 180C for around 20-30 mins until nicely browned and set (I covered the tins with foil for the last 5-10 mins to avoud them going too brown on top).


    9. Whilst the cakes are cooking/ cooling prepare the cream filling by whipping the CremoVita with the toffee sauce using an electric hand whisk until all of the toffee is completely mixed in. Chill this in the fridge to thicken.
     

    10. Now to caramelise the bananas, put the sugar and water into a frying pan and heat to dissolve the sugar. When the sugar has dissolved and the mixture is bubbling add in the sliced bananas. Coat all of the slices and cook, turning them over occasionally for  about 5 minutes.


    11. When cooked place the banana slices on a baking sheet to cool making sure that they don't stick together.


    12.Now to whip up the caramel frosting (Em had the idea to make it caramel flavoured from a recipe she had seen in the 'My Sweet Vegan' cookbook). Add the water to the dark brown sugar and heat to dissolve the sugar (in a saucepan or in a dish in the microwave for 1-2 mins). Whisk the soya margarine and icing sugar together and then add in the dark brown sugar mixture. Continue adding icing sugar and mixing until you have the desired thick frosting consistency.

    13. The cake should now be cool enough to assemble so simply spread a layer of the toffee cream filling on one side of one of the cakes and top this off with a few caramelised bananas.


    14. Pop the top of the cake on, smother it all with frosting, cut the fudge into cubes and crumble some to decorate and place on your remaining caramelised bananas. Voila!


    25/03/2010

    Raw chocolate orange and coconut cake

    Part one of my birthday cake bonanza is my very exciting first experiment with raw cake. Why did I make a raw cake?? Well, although by no means a raw foodie I'm very interested in the whole raw food approach. If I only used raw, natural and preferably organic ingredients (so obviously no refined sugar or artificial flavours) I concluded that it must be healthy and thus guilt free, as well as cruelty free of course. Well, who could refuse the prospect of guilt free cake?! Also, I was curious to see what sort of taste I could create from a non cooked cake and the answer is a really rather delicious one. I gave it a good chance by choosing my favourite flavour combination of chocolate and orange and throwing in some coconut for added texture and interest.


    I love the raw Nakd bars and it probably wont surprise you to know my favourite is 'cocoa orange'. I can honestly say that my creation was not dissimilar in taste and it took less than 20 mins to put together. A good result.

    Ingredients

    For the cake
    • 2 handfuls of raisins/ sultanas
    • 25 pitted chopped dates
    • Juice of 1 orange (~1/2 cup)
    • Roughly 50g cacao beans (or nibs or raw cocoa/carob powder)
    • 250g walnuts ~ 2 1/2 cups
    • 2 handfuls of raw coconut
    • Zest of 1 orange
    For the Orange frosting (From 'Raw food for Real People' by Rod Rotondi)
    • Juice of 1 orange (~1/2 cup)
    • 1/2 cup chopped pitted dates
    • 1 1/2 cups cashews soaked for 2 hours
    1. The first thing I did was to soak the chopped pitted dates and 1/2 of the sultanas in the juice of 1 orange. Initially I thought if I bought some fresh orange juice such as Tropicana this would be raw but it looks like most fresh juices are pasteurised i.e. heated so to be extra sure and stick with the raw thing I bought an orange and squeezed it instead!


     2. I then whizzed the cacao beans using a stick blender (not necessary if you've got raw cocoa/carob powder and if you're using cacoa nibs you can either choose to blend them or leave whole).


    3. Next I blended the walnuts in the food processor (be careful not to over-blend or the nuts will become oily) adding the cacoa bean powder and drained dates and sultanas. I also added the orange juice the fruit had been soaking in bit by bit until I had the desired consistency, sticky but not too wet.

    If your blender's not great or you didn't chop the dates (as I didn't) you may have to finish this stage off with the stick blender.

    4. Once nicely blended I then stirred through the orange zest (leaving a small bit for the top), the rest of the sultanas and the coconut slices (again leaving a few for the top). Have a taste and see if you want more orange/ whatever flavour you're using. Some complimentary spices would probably be good for adding flavour without making the mixture wet.


    5. Once I had finished putting the mixture together I simply shaped it on a plate into a cake like shape and sprinkled coconut and orange zest on top. (I also sprinled some coconut on the plate first so the mixture wouldn't stick to the plate and would come off in nice slices).


    6. I then decided I wanted to do a little more as the whole process had been so quick and easy so I consulted my 'Raw food for Real People' book and found a recipe for orange frosting as part of a raw carrot cake recipe. Perfect (I like this book a lot, although I have only actually made one recipe from it so far,  but I feel I should mention that although for 'real people' this book will make you want a food dehydrator if you don't have one already)


    7. I soaked the cashews for 2 hours and then blended them with the dates and orange juice adding the cashews in bit by bit. Halfway through this frosting was tasting gooood, at the end it tasted a bit grainy and far too nutty for me. Next time I shall probably try half as many cashews or a different frosting perhaps using coconut milk. Anyway, it was still pleasant and I decided to pipe on the frosting in a pattern rather than spread it all over the top as I had initially envisioned which looked pretty good.


    All in all I was very chuffed with the outcome and it went down very well with everyone yesterday - despite having to compete with banoffee fudge cake! I have just enjoyed the last slice with lunch and the flavours seem to taste even better today. I will definately be making more raw cake and experimenting with different flavours. I'm also hoping to be the proud owner of a food dehydrator in the near future so I will be experimenting with lots of other healthy raw dishes too, watch this space :)

    22/03/2010

    Beautiful Bakewells

    About a month ago I had my first go at veganising Bakewell tart and it was absolutely yum. Perfectly authentic and really simple. I knew I had to make it again at some point in the near future it was that good and this weekend I re-discovered some cute little flan/tart dishes I had so I thought I'd give mini Bakewells a go. I particularly wanted to do individual ones so I could ice some and leave some un-iced to decide which was best (I've now decided I like both the taste and aesthetic of a variety when making individual ones). In hindsight, although the flan dishes looked good, they are perhaps a little shallow for Bakewell and so I'm now on the hunt for something cute but deeper for next time.


    I used an amalgamation of a couple of recipes for inspiration and just veganised them but I relied on my trusty Delia veganisation for the pastry. It makes *such* good pastry, it's so easy to roll out and tastes delicious.

    Ingredients

    For the pastry
    • 175g plain flour sieved 
    • Pinch of salt
    • 80g Pure soya spread (or other vegan spread just as good I imagine)
    • 2 to 3 tbsp cold water
    For the filling
    • 150g soya spread
    • 150g caster sugar
    • Approx 2 to 3 heaped tbsp raspberry jam (or why not try whatever's your fave for something a bit different - blueberry??)
    • 150g ground almonds
    • 3 *eggs*
      • 1/4 cup blended tofu =1
      • 1 tbsp oil, 2tbsp water, 2 tsp baking powder =1
      • 2 heaped tbsp wholewheat flour =1
    • 1 tbsp oil
    • 2 tsp vanilla
    For decoration
    • Flaked almonds
    • Icing sugar
    • Natural colour cherries
    1. I began by making the pastry, sieving the plain flour into a large bowl remembering of course to Delia-ise this step and make a large floury mess whilst toning my upper arms. I then chopped the soya spread into cubes and added it to the flour. I rubbed this together, again from as ridiculous a height as I could manage without getting it in my hair, until I had a nice even crumbly texture and achey breaky arm muscles.


    2. I then added 2 tbsp cold water to bring the pastry together a la Delia by cutting with a round edged knife. I find it looks pretty dry but when i get my hands in to help it into a ball its wetter than I expect. Anyway I needed 1 extra tbsp cold water to bring it all together nicely but don't add too much at once. When I had my nice little pastry ball I wrapped it in cling film (or foil) and chilled it in the fridge for around 20 mins.


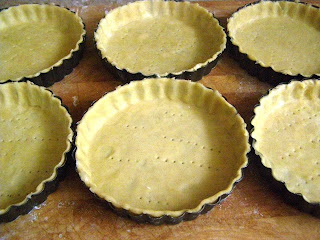
    3. After that I rolled out the pastry and popped it in my dishes (I lightly greased these just incase with soya spread although they did have removable bases and came out like a dream), pricked the bases with a fork a few times and bunged them back in the fridge to chill for another 20 mins.


    4. I then lined the pastry cases with foil and added baking beans (adzuki beans and split peas actually but it seemed to work) and cooked them at 180C for 20 mins to turn nice and golden.

    5. Whilst the pastry cases were in the oven I made the filling first creaming the soya spread and caster sugar together.


    6. I then blended my tofu *egg* and mixed it up with the oil, water and baking powder *egg*. I added this and the wholewheat flour to the creamed sugar mix along with the tbsp of oil and 2tsp vanilla and folded in the ground almonds.

    7. When out of the oven I let the pastry cases cool slightly, but not much as I was impatient, and then spread some raspberry jam over the base of each one.


    8. I then splodged the ground almond mixture on top carefully so the layers didn't mix together. To some of them I added flaked almonds in an 'artistic' pattern and some I left plain as I wanted to completely ice them a la Kipling and thought a hidden crunch might not be good.


    9. I baked them at 180C for about half an hour until they felt 'set' to the touch but not too firm, I did cover them with foil after around 20 mins as I was worried about them browning too much. Once out of the oven they continued to firm up as they cooled down, I think next time i'll take them out a touch sooner.


    10. I then popped them out of their tins to cool and made up some stiff icing using simply icing sugar and water. When they had cooled (mostly anyway, I'm soo impatient) I iced a few and added cherries to some.


    And here's the (full sized) one I made earlier again incase you missed it


    Yum.