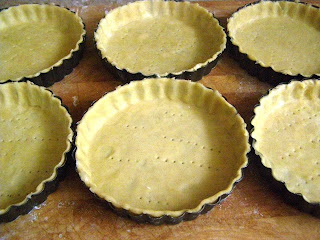
I used an amalgamation of a couple of recipes for inspiration and just veganised them but I relied on my trusty Delia veganisation for the pastry. It makes *such* good pastry, it's so easy to roll out and tastes delicious.
Ingredients
For the pastry
- 175g plain flour sieved
- Pinch of salt
- 80g Pure soya spread (or other vegan spread just as good I imagine)
- 2 to 3 tbsp cold water
- 150g soya spread
- 150g caster sugar
- Approx 2 to 3 heaped tbsp raspberry jam (or why not try whatever's your fave for something a bit different - blueberry??)
- 150g ground almonds
- 3 *eggs*
- 1/4 cup blended tofu =1
- 1 tbsp oil, 2tbsp water, 2 tsp baking powder =1
- 2 heaped tbsp wholewheat flour =1
- 1 tbsp oil
- 2 tsp vanilla
- Flaked almonds
- Icing sugar
- Natural colour cherries
2. I then added 2 tbsp cold water to bring the pastry together a la Delia by cutting with a round edged knife. I find it looks pretty dry but when i get my hands in to help it into a ball its wetter than I expect. Anyway I needed 1 extra tbsp cold water to bring it all together nicely but don't add too much at once. When I had my nice little pastry ball I wrapped it in cling film (or foil) and chilled it in the fridge for around 20 mins.
3. After that I rolled out the pastry and popped it in my dishes (I lightly greased these just incase with soya spread although they did have removable bases and came out like a dream), pricked the bases with a fork a few times and bunged them back in the fridge to chill for another 20 mins.
4. I then lined the pastry cases with foil and added baking beans (adzuki beans and split peas actually but it seemed to work) and cooked them at 180C for 20 mins to turn nice and golden.
5. Whilst the pastry cases were in the oven I made the filling first creaming the soya spread and caster sugar together.
6. I then blended my tofu *egg* and mixed it up with the oil, water and baking powder *egg*. I added this and the wholewheat flour to the creamed sugar mix along with the tbsp of oil and 2tsp vanilla and folded in the ground almonds.
7. When out of the oven I let the pastry cases cool slightly, but not much as I was impatient, and then spread some raspberry jam over the base of each one.
8. I then splodged the ground almond mixture on top carefully so the layers didn't mix together. To some of them I added flaked almonds in an 'artistic' pattern and some I left plain as I wanted to completely ice them a la Kipling and thought a hidden crunch might not be good.
9. I baked them at 180C for about half an hour until they felt 'set' to the touch but not too firm, I did cover them with foil after around 20 mins as I was worried about them browning too much. Once out of the oven they continued to firm up as they cooled down, I think next time i'll take them out a touch sooner.
10. I then popped them out of their tins to cool and made up some stiff icing using simply icing sugar and water. When they had cooled (mostly anyway, I'm soo impatient) I iced a few and added cherries to some.
And here's the (full sized) one I made earlier again incase you missed it
Yum.


I can't wait to try this recipe! I love love love these, and used to love Mr. Kipling when I lived in London years ago (when I wasn't vegan). I'm so excited to be able to make these at home!
ReplyDeleteThey look gorgeous! I especially love how when you write about your recipes, you put the numbers of "eggs" and how you make it vegan. :)
ReplyDeleteThanks guys :)
ReplyDelete@kim g. I know, they're so much easier than I thought to make yourself! Let me know how they turn out when you give it a go.
@Molly Laurel Thank you :) I figure then the recipe looks as simple as it really is, and you know why certain ingredients are included. Also if you have your own trusty egg replacer you can experiment with using that instead (or you could always use the egg replacer ideas for similar recipes that you're stuck trying to replace eggs in)
They look delcious! I have always wanted to try making vegan bakewells, thanks for sharing your recipe :)
ReplyDeleteThey look beautiful - and yum! Thanks for posting, I can't wait to try making these!!
ReplyDelete